Description
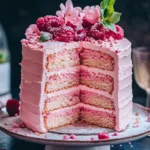
Celebrate in style with this Delicious Dreamy Pink Champagne Cake! Light, fluffy layers infused with bubbly pink champagne create a delicate sweetness, while a luscious frosting adds the perfect touch of elegance. A festive, dreamy dessert for any special occasion! 🎂🥂💖✨
Ingredients
- Pink champagne – 1 cup
- Flour – 2 ½ cups
- Sugar – 1 ½ cups
- Baking powder – 1 tablespoon
- Salt – ½ teaspoon
- Butter – ¾ cup (softened)
- Eggs – 3 large
- Milk – 1 cup
- Vanilla extract – 2 teaspoons
- Pink food coloring – as needed
- Champagne frosting – to taste
Instructions
Begin by preheating your oven to a warm 350°F (175°C). While the oven warms up, grease and flour the bottoms of your two 8-inch round cake pans. This prevents sticking and ensures that each cake layer slides out smoothly once baked—picture the beautiful, fluffy layers ready to be stacked high.
In a large bowl, whisk together the flour, baking powder, and salt. Allow the whisk to dance through the ingredients, incorporating air for a lighter cake texture. This step lays the groundwork for a tender crumb that will melt in your mouth!
In another bowl, beat the softened butter and sugar until they transform into a light and fluffy mixture. This can take around 3-5 minutes of vigorous mixing. The color should change to a pale yellow, and the texture will become fluffy. This process helps to incorporate air, leading to that beautiful rise during baking.
Now, add the eggs one at a time, ensuring each one is fully incorporated before the next goes in. Mix in the champagne and vanilla extract, creating a delightful aroma that fills your kitchen and teasingly hints at the flavors to come.
Gradually add the dry ingredients mixture to the wet ingredients, alternating with the buttermilk. Start and end with the flour mixture. This ensures that your batter combines smoothly, reducing the chance of over-mixing. Watch as it transforms into a luscious, pink-hued batter that promises deliciousness in each bite!
Divide the batter evenly between the prepared pans. Smooth the tops with a spatula. Carefully place the pans in your preheated oven and bake for 25-30 minutes. You’ll know they are done when a toothpick inserted in the center comes out clean. Your kitchen will be filled with an enticing aroma as the cake rises beautifully.
After baking, allow the cakes to cool in the pans for about 10 minutes. Gently run a knife around the edges to loosen them, then invert them onto wire racks to cool completely. The moment when you flip the pans over and see those perfect cakes is incredibly satisfying.
For the champagne frosting, beat the butter until creamy, then gradually add powdered sugar, mixing until well combined. Add champagne a little at a time until you reach your desired consistency. The frosting should be creamy and easily spreadable, perfect for enveloping your cakes in flavor.
Once the cake layers have cooled, place the first layer on a serving platter. Generously spread a layer of frosting on top, then gently add the second layer. Finally, frost the top and sides of the cake. Be creative and make it look as elegant or fun as you desire!
To add a charming touch, consider adding edible glitter or sprinkles. Slice the cake after it has set for another 30 minutes—each slice revealing the lovely pink layers inside. Gather friends and family, and let the celebration begin!
Notes
Baking Temperature Matters
Always ensure your oven is preheated fully. A consistent temperature is crucial for even baking. The right heat will create beautiful, fluffy layers instead of dry or undercooked centers.
Storing Leftovers
If you have any cake leftovers, store them in an airtight container in the refrigerator. The Pink Champagne Cake stays fresh for up to five days—though it might not stick around that long!
Experiment with Flavors
Feel free to explore different flavor combinations. Adding raspberry or strawberry puree to the batter could complement the champagne perfectly, giving bursts of fruitiness in every slice.
Crafting the Perfect Occasion
Consider this luscious Pink Champagne Cake for various celebrations. Whether it’s a wedding, anniversary, or a special birthday, this cake not only pleases the palate but also brings an enchanting visual appeal. Each slice served can turn an ordinary moment into a memory worth cherishing.
Elevating Your Dessert Game
The process of baking can be as delightful as the final product. Allow yourself to enjoy the entire art of cake-making—from whisking the batter to decorating the cake. Each step is an opportunity to infuse your creativity, making the cake truly yours.
Sharing the Joy
Baking is not just about feeding the body but also nourishing the soul. Share the joy of baking with loved ones, whether it’s inviting them to help in the kitchen or presenting them with a slice of your masterpiece. There’s nothing more rewarding than watching their faces light up with joy at the taste of your Pink Champagne Cake!
- Prep Time: 20 minutes
- Cook Time: 25-30 minutes