Full nutrition details in the recipe card below ↓

Every recipe on FoodNearMe is tested to be anti-inflammatory, satisfying, and actually delicious — real food, real results, no shortcuts.
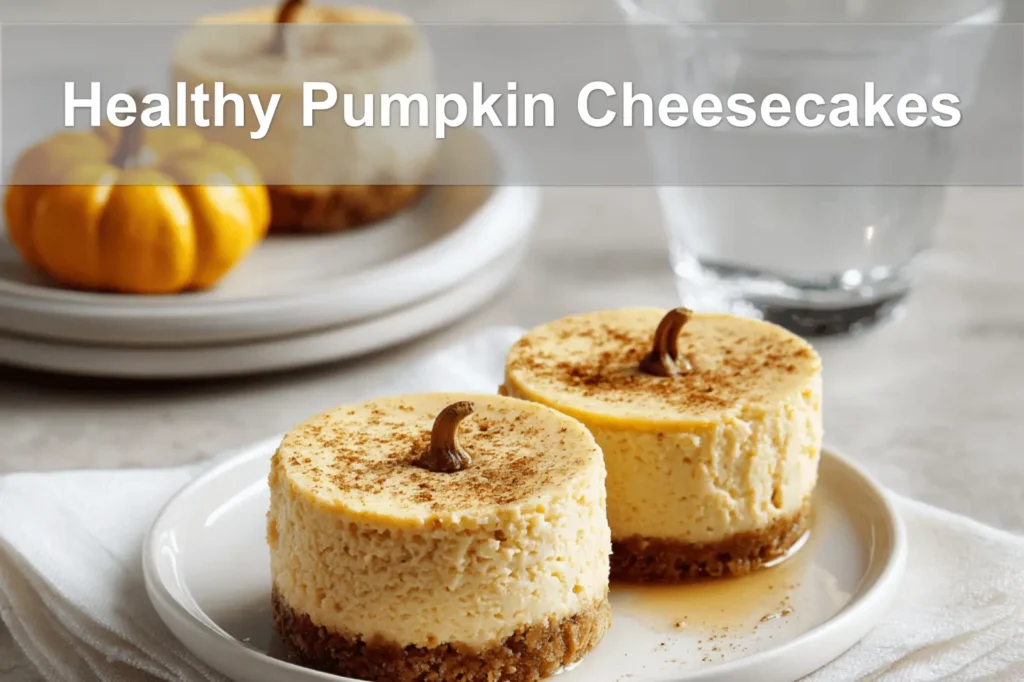
More about Joe →Ever notice how cinnamon and clove in the air makes you wanna dig out your coziest socks? These healthy pumpkin cheesecakes are like that—small, creamy hugs. They’re blowing up on Pinterest and TikTok lately, and for good reason. Faster than pie, easier than you’d think, and totally beginner-friendly.
It’s a cozy dessert with a creamy swirl of Greek yogurt, canned pumpkin, and warm spice magic. No fuss—just stuff you already got and a muffin pan. Like grandma’s cheesecake took a yoga class and learned to chill. Full details in the blog!
Learned this trick while testing recipes in a tiny farm kitchen with mismatched measuring spoons. Years of hands-on cooking taught me what works—and what people actually make. No fads. No fluff. Just real comfort food. I added a smart little twist. You’ll see!
Why You’ll Love These Mini Cheesecakes
There’s nothing like the warm spices of fall to give you that cozy hug-in-a-bite feeling, and these healthy pumpkin cheesecakes deliver all that nostalgia—without the guilt. Each little cheesecake is perfectly portioned, so you get that rich, creamy satisfaction without overindulging.
What makes them healthier? We swapped heavy cream and full-fat cream cheese for nonfat Greek yogurt and Neufchatel cheese. Plus, they’re lightly sweetened with pure maple syrup instead of loads of sugar. And yes, they pack a punch of pumpkin spice goodness to wrap you in fall comfort!
Ingredients & Tools Breakdown
The ingredients are as simple and approachable as they come. For the crust, almond flour brings a buttery, nutty texture while ground cinnamon and a touch of brown sugar keep things warm and cozy. Melted butter brings it all together.

The filling? That’s where the magic happens. Neufchatel cheese adds creaminess, while nonfat Greek yogurt lightens things up. With just ½ cup of pumpkin puree and a mix of cinnamon, nutmeg, and ginger, you’ll get all the flavor of pumpkin pie in cheesecake form. Don’t forget the vanilla extract—totally necessary for that extra depth!
Tools you’ll need: A 12-cup muffin pan, some parchment liners to keep life simple (less scrubbing!), and a hand or stand mixer to whip everything together.
Step-by-Step Process
1. Make the crust: Mix almond flour, brown sugar, cinnamon, and melted butter in a bowl until it resembles wet sand. Press about a tablespoon into each lined muffin cup, then bake at 350°F for about 5 minutes. Pro Tip: Don’t skip prebaking—it keeps the crust sturdy under the creamy filling.
2. Prep the filling: Beat Neufchatel cheese with Greek yogurt until smooth and fluffy—this step makes all the difference! Then add pumpkin, maple syrup, vanilla, and spices. Mix until just combined, but don’t overdo it!
3. Assemble and bake: Spoon the filling over the prebaked crusts, filling each cup almost to the top. Bake for 18–20 minutes until the centers are set but still slightly jiggly. Cool to room temp, then chill in the fridge to let the flavors meld. They taste even better the next day!
Customizations to Try
Make ’em your own with a few simple tweaks! Want a gluten-free option? Grab gluten-free graham crackers or use a touch of shredded coconut in place of the almond flour crust. If you’re dairy-free, try swapping Neufchatel and yogurt for your favorite plant-based cream cheese and coconut yogurt.
You can also dress them up with toppings! A dollop of whipped coconut cream and a sprinkle of cinnamon takes these to the next level. Or, for a nutty twist, add a few chopped pecans before serving. So many ways to keep it cozy and fun!
How to Serve and Store
These mini cheesecakes are best served chilled; the cool, creamy texture is unbeatable. Just before serving, top with a drizzle of maple syrup or a sprinkle of cinnamon for a little extra flair. They’re perfect for family dinners, holiday gatherings, or as a make-ahead treat for the week.
To store, pack them in an airtight container and keep them in the fridge for up to 5 days. If you’re planning ahead, freeze them (without toppings) for up to a month. Just thaw overnight in the fridge and they’ll still taste amazing!
| Storage Method | How Long They Keep |
|---|---|
| Refrigerated | Up to 5 days |
| Frozen | Up to 1 month |
Expert Insight: The Appeal of Healthy Pumpkin Cheesecakes
Healthy Pumpkin Cheesecakes balance indulgence with nutrition by incorporating pumpkin’s natural fiber and antioxidants while reducing added sugars and fats. This makes them a smarter dessert choice that still delivers the creamy richness and warm spices traditional cheesecakes are known for.
For more delicious recipes and cooking inspiration, follow me on Facebook, Pinterest and Reddit!
A Cozy Fall Moment
These Healthy Pumpkin Cheesecakes remind me of cozy autumn afternoons spent baking with my mom. Every bite brings that warm, spiced comfort we loved, but now with a healthy twist that fits our busy lives. It’s become a favorite way to share sweetness without the guilt, especially around family gatherings.
FAQs ( Healthy Pumpkin Cheesecakes )
Are Healthy Pumpkin Cheesecakes gluten-free?
Yes, Healthy Pumpkin Cheesecakes can be gluten-free if you use gluten-free graham crackers or almond flour for the crust. This makes them perfect for those with gluten sensitivities or anyone following a gluten-free diet. Always double-check your ingredient labels to ensure there’s no hidden gluten.
Can I make Healthy Pumpkin Cheesecakes ahead of time?
Absolutely! Healthy Pumpkin Cheesecakes actually taste better after they’ve had time to chill. You can prepare them a day or two in advance and store them in the refrigerator. Just cover them tightly with plastic wrap to keep them fresh and creamy.
What are some healthy substitutes in this recipe?
You can swap regular cream cheese with reduced-fat or plant-based cream cheese to cut calories and fat. For sweeteners, natural options like maple syrup or honey work great instead of refined sugars. Also, using Greek yogurt can add protein and creaminess without extra fat.
How long do Healthy Pumpkin Cheesecakes last in the fridge?
Stored properly in an airtight container, your Healthy Pumpkin Cheesecakes will keep well for up to 4-5 days in the fridge. Beyond that, the texture and flavor might start to decline, so it’s best to enjoy them within this timeframe for maximum freshness.
Can I freeze Healthy Pumpkin Cheesecakes?
Yes, freezing Healthy Pumpkin Cheesecakes is a great way to extend their shelf life. Wrap each cheesecake tightly in plastic wrap and then foil, or use an airtight container. When ready to enjoy, thaw them overnight in the fridge for the best texture.
Wrapping Up Your Healthy Pumpkin Cheesecakes
These healthy pumpkin cheesecakes come together in under 30 minutes, delivering that creamy, spiced comfort we all crave. Perfect for easy baking days when you want a homemade treat without fuss—and the texture? Soft, smooth, and just cozy enough to feel like a little fall hug.
Feeling adventurous? Swap almond flour for oat crumbs, or add a handful of chopped walnuts for crunch. Store leftovers chilled for up to five days or freeze for later—my favorite kitchen hack to keep family desserts ready on a whim. A tip I love: a quick dusting of cinnamon before serving takes it next level.
Give this recipe a whirl and share your twists! Did pumpkin desserts stir up any family memories for you? Pass these out to friends or keep a batch for yourself—you’ll wanna make them again and again. Cozy moments start right here in your kitchen.

Healthy Pumpkin Cheesecakes for Guilt-Free Fall Desserts
Ingredients
Method
- Preheat the oven to 350°F (175°C). In a bowl, combine almond flour, brown sugar, and 1/2 teaspoon ground cinnamon. Add melted butter and mix until the crust mixture is crumbly but holds together when pressed. Press the crust mixture evenly into the bottom of a muffin tin or cheesecake pan. Bake the crust for 8-10 minutes until lightly golden and set aside to cool. In a large bowl, beat neufchatel cream cheese until smooth. Add nonfat Greek yogurt, pumpkin puree, maple syrup, and vanilla extract; mix until well combined. Stir in ground cinnamon, nutmeg, and ginger until evenly distributed. Pour the filling over the cooled crust in the pan, dividing evenly. Bake for 15-18 minutes, or until the filling is set but slightly jiggly in the center. Remove from oven and let cool completely before refrigerating for at least 2 hours. Serve chilled and enjoy your guilt-free fall dessert!
Notes
Store leftovers in an airtight container in the refrigerator for up to 4 days.
You can add a dollop of whipped cream or a sprinkle of cinnamon before serving for extra flavor.